The Job Orders feature in Onimator lets you automate comment actions on Instagram posts using your connected accounts.
Since Onimator performs actions on real physical devices, the comments appear genuine and human-like — ideal for engagement campaigns, giveaways, or client promotions.
🧭 Accessing the Job Orders Page
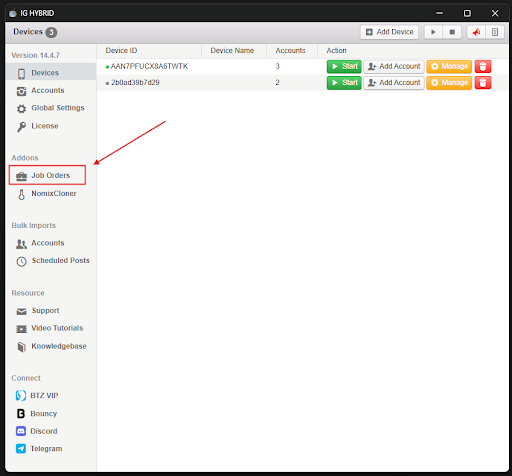
- Open your Onimator dashboard.
- From the left-side menu, click Job Order.
**
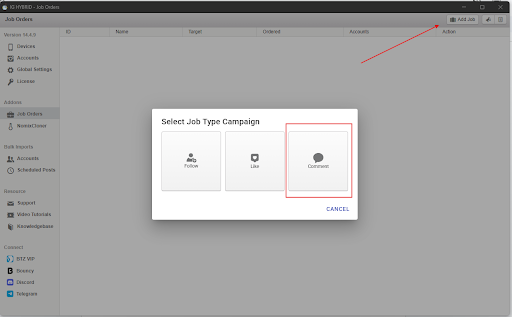
- Click Add Job to open the setup window for a new job.
**
📝 Understanding the Job Fields

**
When the setup window opens, you’ll see several input fields that define how your comment job behaves:
Job Name
Name your job clearly so you can recognize it later.
Examples: Client Post Comments, Event Launch Push, Promo Post Engagement.
Target Post URL
Paste the exact link to the Instagram post you want your accounts to comment on.
This ensures that comments are sent to a specific post rather than the account in general.
Example format:
https://www.instagram.com/p/xxxxxxxxxxx/
Comments to Deliver
Enter how many total comments you want Onimator to send. The system will distribute them across the accounts you select.
Limit Comments per Hour
Controls how many comments the post receives per hour.
If set to 10, only 10 comments will be delivered every hour regardless of how many accounts are assigned.
This pacing keeps activity natural and avoids suspicious spikes.
Limit Comments per Day
Specifies the maximum number of comments per day for that post.
When the limit is reached, Onimator automatically pauses the job until the next day.
Comment Text Area
🌀 Option 1: Use Spin Syntax for Randomized Comments
You can write comments using spin syntax so that Onimator automatically creates variations. This prevents repetitive or bot-like activity.
You do not need to write one comment per line. Instead, use the following syntax pattern:
How spin syntax works:
- Curly braces {} group different choices.
- Example: {Amazing|Awesome|Love this}
- The vertical bar | separates your options.
- Example: This is {great|solid|so good}
- You can chain multiple groups.
- Example: {Amazing|Awesome} {post|content} {🔥|💯|🙌}
- Nesting is also supported for deeper randomness.
- Example: {Really {love|like}|Totally into} this {post|shot} {so clean|super clean} {👏|🙌}
Sample ready-to-use templates:
- {Amazing|Awesome|Love this} {post|content} {🔥|💯|🙌}
- {Really {love|like}|Totally into} this {post|shot} {so clean|super clean} {👏|🙌}
- This deserves {more views|to trend|the spotlight} {fr|for real} {😮|✨}
- {Great work|Nice one|Clean result} keep it up {team|fam|mate} {👍|✅}
Tips for better results:
- Keep comments casual and realistic.
- Mix emojis, slang, and phrasing for natural output.
- Check sample expansions before saving your job.
🤖 Option 2: Use [AI] for Automatic Smart Comments
If you add the tag [AI] anywhere inside your comment text area, Onimator will automatically generate an intelligent, context-aware comment using AI.
For example:
- Typing just [AI] will let the system create a unique comment based on the target post.
- You can also combine [AI] with spin syntax for hybrid results.
Examples:
- [AI] — the bot writes a natural comment using AI only.
- {[AI]|{Awesome|Nice}|{🔥|💯}} — mixes AI-generated and manual variations for even more diversity.
- Love this vibe! {[AI]|🔥|💯} — adds an AI comment sometimes and emoji reactions at other times.
Using [AI] is perfect for users who want dynamic, smart, and realistic comments without manually writing long lists.
✅ Selecting Accounts for the Job
After filling in all the job details:
- Click Save and Select Accounts.
- A popup will appear showing all available accounts.
- Use the search box to quickly filter through them.
- Select the accounts you want to use for this comment job.
- Click Save.
👉 Reminder: Only accounts with Participate Job Orders enabled in their Account Settings will appear here.
If an account doesn’t show up, open its settings and toggle this option on.
📱 Running the Devices
Once your job is configured, ensure the devices linked to your selected accounts are active.
- Go to the Devices Page.
- Start each device associated with the chosen accounts.
- Confirm that all devices are online and connected to Onimator.
Inactive devices will not perform any comment actions.
⚙️ Setting Up Account Timers
You do not need to manually enable the Comment Action in the account settings for the job to run.
However, you must configure each account’s timer schedule.
The timer determines when an account will execute job actions. Without it, the account will remain idle even if devices are running.
💡 Why Comment Job Orders Are Useful
- Boost engagement and visibility on posts safely.
- Use real devices, not API calls — making actions undetectable.
- Perfect for influencer marketing, promotions, and organic growth.
- Flexible pacing with hourly and daily limits.
- Works seamlessly alongside follow and like jobs.
🧠 Pro Tips
- Write natural, conversation-style comments — not generic spam.
- Vary tone, emojis, and sentence length for authenticity.
- Combine Comment Jobs with Like or Follow Jobs for maximum engagement.
- Keep hourly and daily limits conservative to maintain account health.
- Always confirm your devices are active before starting a campaign