
Overview
Onimator is not a browser tool. It does not log into Instagram from your computer and click things on a webpage. It drives a real Android device — a phone, a cloud phone, or an emulator — and taps the actual app the same way your thumb would.
That single fact decides everything on this page. Before Onimator can do anything at all, you need an Android device it can reach, the app already installed and logged in on that device, and your computer given permission to control it.
This guide covers what to buy or rent before you start, which kind of device to choose, and how to get your first one added.
Two apps, one license. You get two programs. IGBot automates Instagram only. Onimator bot covers Threads, TikTok, Snapchat, Reddit, Bumble and Tinder. Your license activates both, so there is nothing to choose between and nothing extra to buy. Everything on this page applies to either one; where they differ, it’s noted. For a full breakdown, see IGBot vs Onimator: What’s the Difference?.
Strategic Purpose: Almost every “it isn’t working” message on day one is a device setup problem, not an Onimator problem. Getting this right once means everything downstream just works.
The 30-Second Version
- You need a Windows PC to run Onimator itself.
- You need at least one Android device running Android 11 or newer — a real phone, a cloud phone, or an emulator.
- On the phone: enable Developer Options, then USB Debugging.
- Install the app you want to automate and log into it manually. Onimator does not log in for you.
- In Onimator, click Add Device and work through the 5-step wizard: Platform → Prepare → Detect → Name it → Verify & Add.
If the phone doesn’t show up as AUTHORIZED in the Detect step, it’s almost always the cable or the “Always allow” prompt. More on that below.
What You’ll Need
- A Windows PC — Onimator runs here. It can be an ordinary laptop; it isn’t doing the heavy lifting.
- At least one Android device running Android 11 or newer — real phone, cloud phone, or emulator. See the comparison below.
- A USB cable that transfers data — not a charge-only cable. This trips up more people than anything else on this page.
- The app you want to automate, installed on the phone and logged in manually — Onimator automates an app that’s already signed in. It does not sign in for you.
- One proxy per account — residential or mobile. Not optional if you plan to run more than one account.
- An Onimator license — activated under License in the sidebar.
Choosing Your Android Device
You have three options. They are not equivalent, and the cheapest one is the one most likely to get your accounts banned.
Whichever you choose, it must run Android 11 or newer. This applies to real phones, cloud phones, and emulators alike. Check the version under Settings → About phone → Android version before you buy or rent anything. A cheap handset stuck on an older release will not work, no matter how well it runs otherwise.
| Real phone | Cloud phone | Emulator | |
|---|---|---|---|
| What it is | A physical Android handset on your desk | A real Android device you rent, running in a data center | Simulated Android running on your PC |
| Cost | One-off. A used handset is often enough | Monthly, per phone | Free |
| Trust with Instagram | Highest | High | Lowest |
| Setup effort | Cables, power, physical space | Lowest. Nothing to plug in | Low, but heavy on your PC |
| Accessible remotely | No, it’s on your desk | Yes, from anywhere | No |
| Best for | Your highest-value accounts | Scaling without buying hardware | Learning and testing only |
Real phones
The strongest option. A physical handset presents a genuine device fingerprint, real sensors, and — if you put a SIM in it — a real mobile carrier IP, which is the most trusted IP class there is.
The cost is practical rather than financial. Phones need power, desk space, and a powered USB hub once you have more than two or three. They also need to stay awake and connected.
You do not need a flagship. A used mid-range Android handset is completely adequate. Buy the cheapest device running Android 11 or newer that still performs smoothly.
Cloud phones
Real Android devices running on real hardware, rented by the month, that you reach over the internet instead of over a cable. From Instagram’s side these look far closer to a real phone than an emulator does.
The trade-off is the IP. A cloud phone comes with a data-center IP address by default, which Instagram trusts far less than a residential or mobile one. Assign a proxy to every account on a cloud phone. Treat that as mandatory, not optional.
Cloud phones are how most people scale past the point where physical phones stop being practical.
Emulators
An emulator is software pretending to be a phone. It is free, it runs on the computer you already own, and it is genuinely useful for one thing: learning the software without risking anything.
Do not run accounts you care about on an emulator. Emulator fingerprints are detectable, and Instagram has had years of practice detecting them. Accounts on emulators get flagged faster and recover more slowly. Use one to click around and understand the interface, then move your real accounts onto real or cloud devices.
How many accounts per device?
Start with one account per device while you’re learning. Once you know what you’re doing, a typical device comfortably handles a small handful of accounts, each in its own clone with its own proxy.
Resist the urge to pack them in. The more accounts sharing one device, the more they share a fingerprint, and shared fingerprints are how a single ban becomes a cluster ban.
Adding Your First Phone
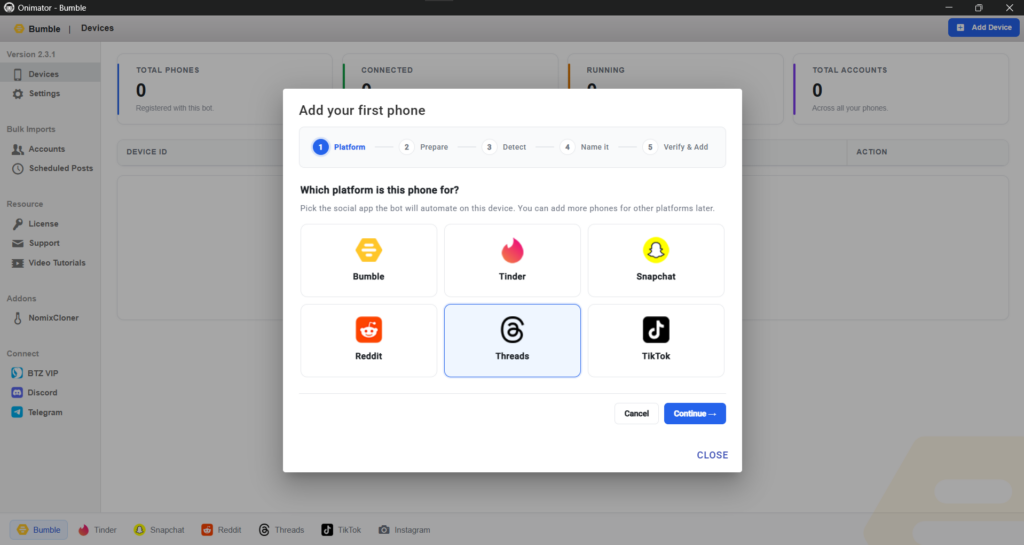
Onimator adds phones through a 5-step wizard. Click Add Device in the top-right of the Devices screen to open it.
Platform → Prepare → Detect → Name it → Verify & Add
The wizard is the same for every platform. Instagram, Threads, TikTok, Bumble, Tinder, Snapchat, Reddit — only Step 1 changes. Learn it once and you know it everywhere.
Step 1 — Platform
The wizard asks which platform this phone is for. Pick the app the bot will automate on this device.
One phone, one platform. Each phone entry is dedicated to a single platform. If you want to automate both Instagram and TikTok, you add two phone entries — and they can be the same physical phone, registered twice.
Click Continue →.
On IGBot, skip this step. IGBot automates Instagram only, so there is no platform to choose. Click Add Device and the wizard opens straight at Prepare. Everything from Step 2 onward is identical.
Step 2 — Prepare your phone
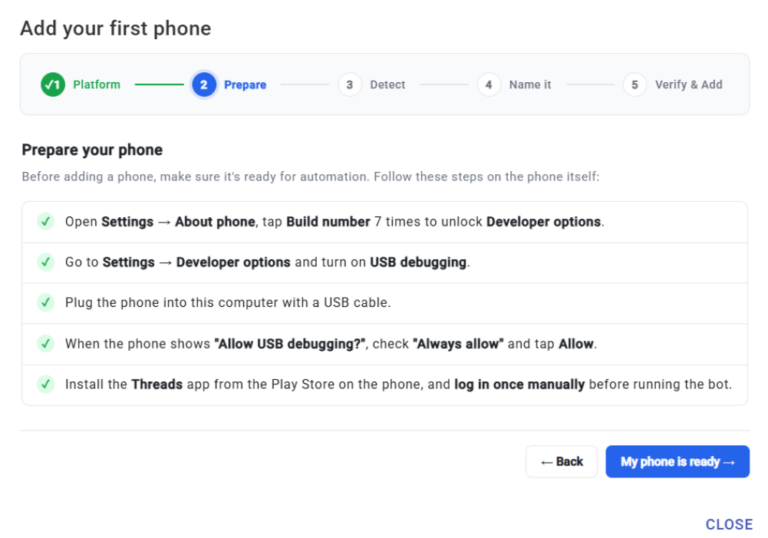
Five things to do on the phone before Onimator can detect it.
- Open Settings → About phone and tap Build number seven times to unlock Developer options.
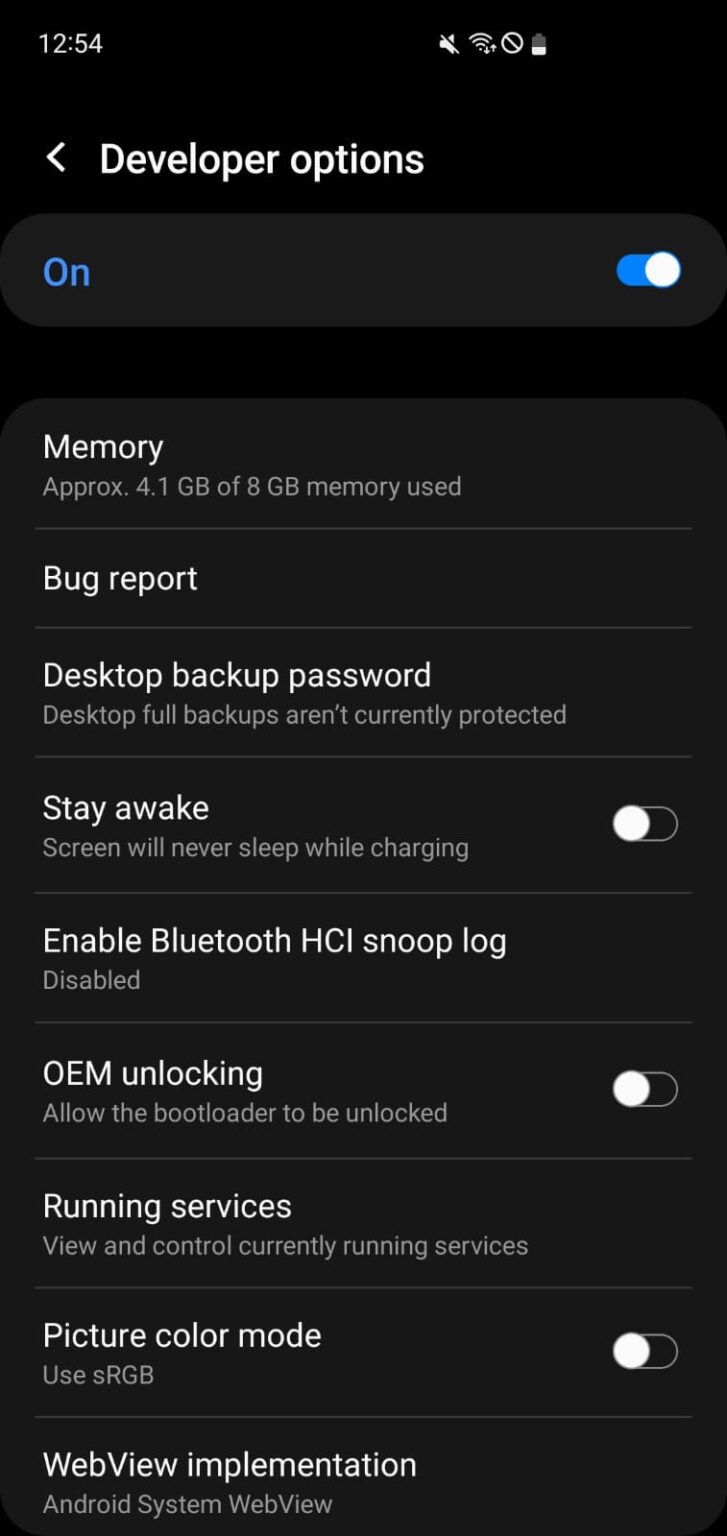
- Go to Settings → Developer options and turn on USB debugging.
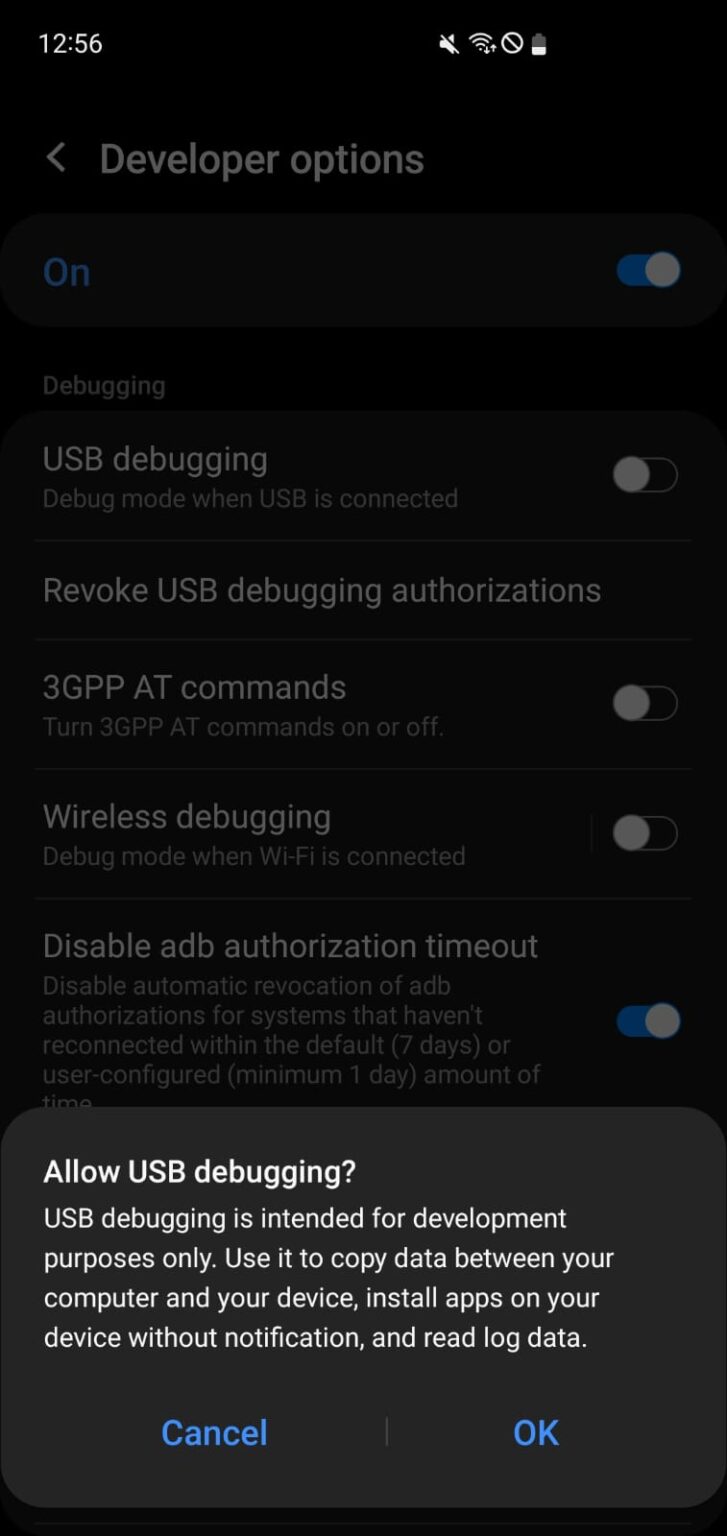
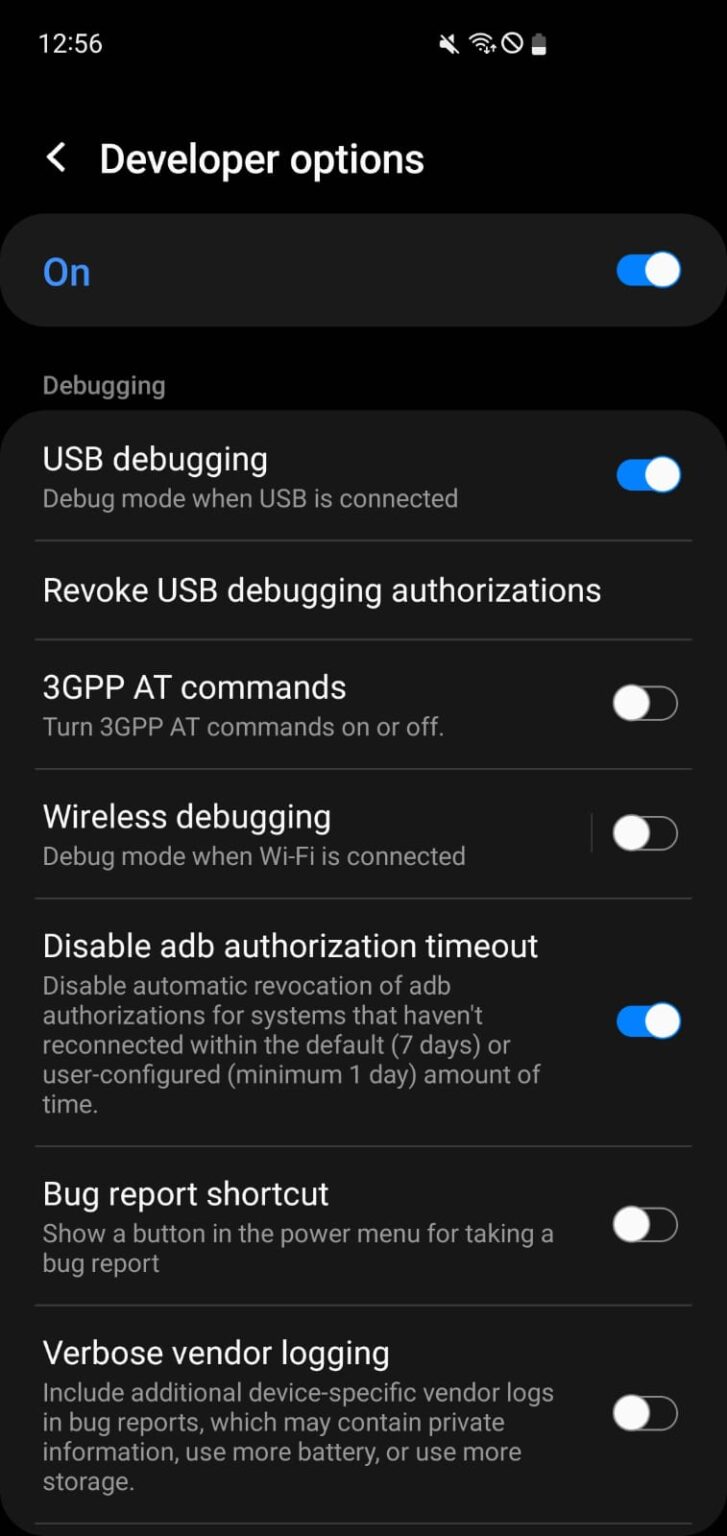
- Plug the phone into this computer with a data-capable USB cable.
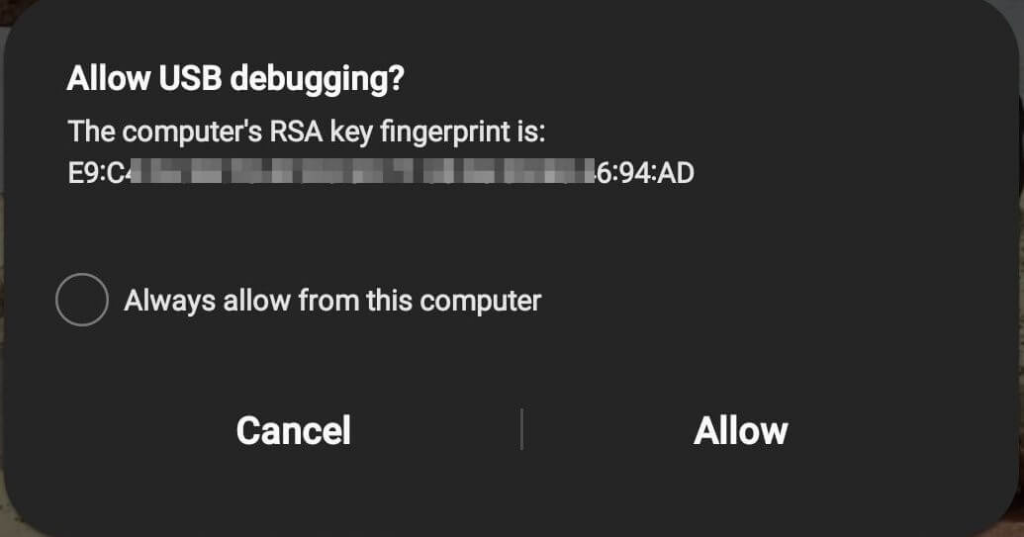
- When the phone shows “Allow USB debugging?”, tick Always allow and tap Allow.
- Install the target app from the Play Store and log in once manually.
Some manufacturers bury Build number one level deeper, under Software information. If you can’t find it, search “build number” in the phone’s own Settings search.
Step 5 is not optional. The bot automates an app that is already logged in. It does not log in for you. Install the app and complete a manual login before adding the phone.
“Always allow” matters. Skip that checkbox and the phone keeps asking for permission, and the bot loses connection every time the phone is unplugged or restarted.
The USB prompt appears on the phone, not on your PC. If the phone’s screen is off, face-down, or locked, you will never see it and the connection silently fails. Unlock the phone and watch its screen while you plug in.
Once all five are done, click My phone is ready →.
Step 3 — Detect phone
Onimator scans for connected phones and rescans automatically every two seconds.
- Your phone appears as a card showing its model name and serial / device ID.
- A green AUTHORIZED badge means it’s ready.
- If nothing appears, click Rescan now, or check the cable and debugging settings.
When the phone shows AUTHORIZED, click Next →.
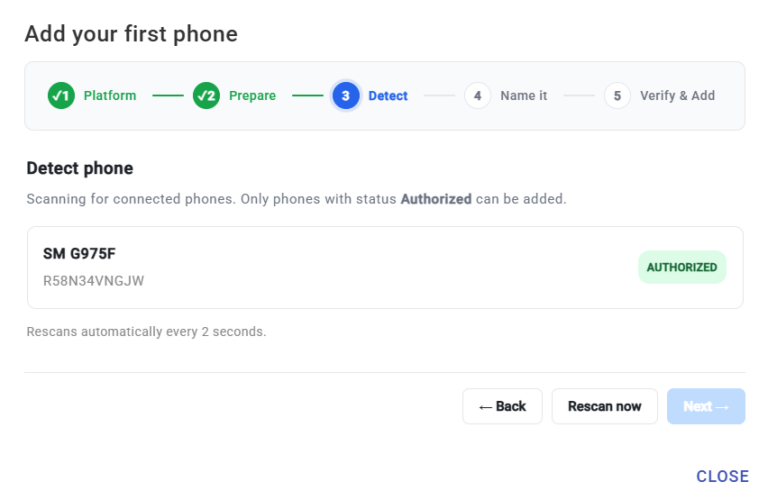
If the badge says “Unauthorized”: the phone never got the “Always allow” tap. Unplug, plug back in, and watch the phone for the prompt.
Step 4 — Name this phone
Give the phone a friendly name so you can tell your devices apart later.
- The name is display-only. Leave it blank to use the serial number.
- Use something meaningful once you run several:
IG-Phone-1,Pixel-Desk,Client-A-Instagram.
Click Run verification →.
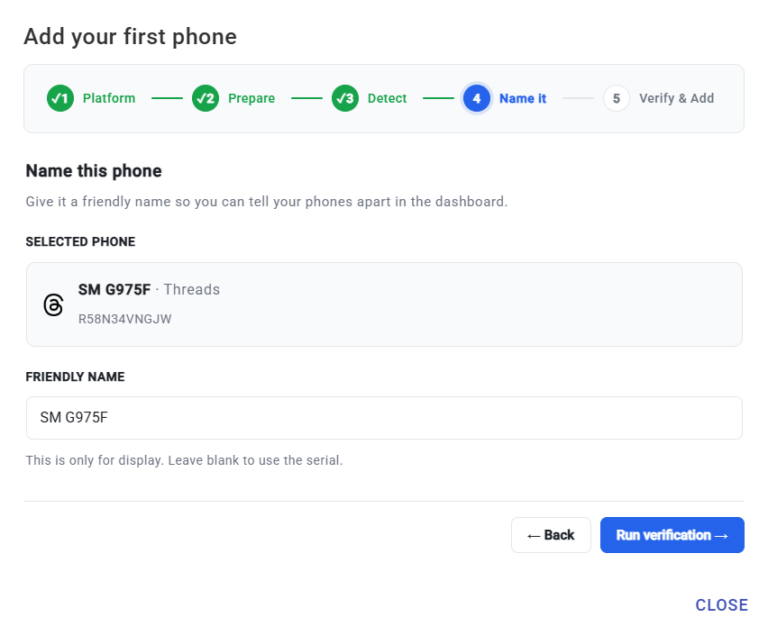
Name phones now, thank yourself later. Once you’re running five or more devices, a screen full of serial numbers is unreadable.
Step 5 — Verify & Add
Onimator runs a quick preflight check. Two things must pass:
- Phone reachable via ADB — the computer can talk to the phone.
- Target app installed — the app you picked in Step 1 is on the device.
When both pass you’ll see a green success message. Click Done.
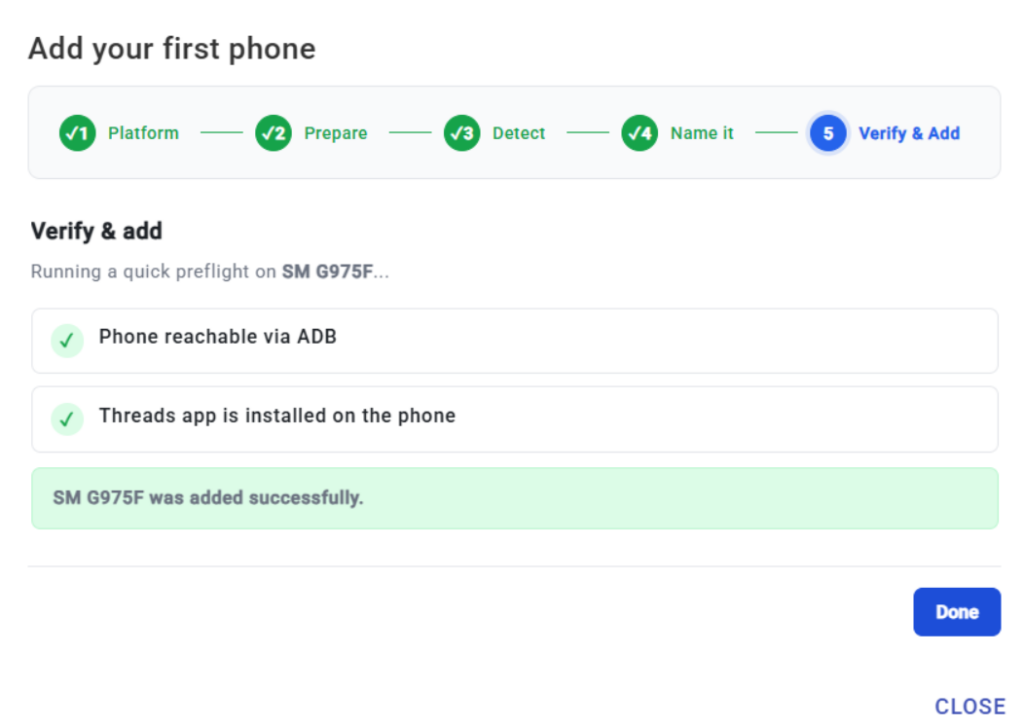
If “app installed” fails: you skipped Step 2, item 5. Install the target app on the phone, then go back and re-run verification.
Cloud Phones and Emulators
Both go through the same wizard. The only difference is how the device becomes reachable in the first place.
Cloud phones — Rent the device, then enable Developer Options and USB debugging inside its Android settings exactly as above. It is still an Android device and still needs those settings. Establish the connection using the details your provider gave you, then run the Add Device wizard as normal.
Assign a proxy to every account on a cloud phone. Without one, the account runs on a data-center IP that Instagram already distrusts, and you have thrown away the main advantage of using a real Android environment.
Emulators — Enable Developer Options and USB debugging inside the emulator, install the target app, log in manually, and start the emulator before opening Onimator. Then run the wizard.
Emulators are demanding. Each running instance needs real CPU and memory, so a machine that runs one comfortably may struggle with three.
Troubleshooting
Ordered roughly by how often each one is the actual cause.
Phone not detected at all — Check the USB cable; many cables are charge-only and carry no data. Try a different port. Confirm USB debugging is still on.
Status shows “Unauthorized” — The “Always allow” prompt wasn’t accepted. Unplug, replug, and tap Allow on the phone. If you previously tapped Deny, use Revoke USB debugging authorizations in Developer options and reconnect.
Status shows “Offline” — Unplug the phone, wait five seconds, plug it back in. If it persists, restart the phone.
Preflight fails on “app installed” — The target app isn’t on the phone, or it’s a different package. Install it from the Play Store.
Phone keeps disconnecting — You most likely missed “Always allow”. Redo Step 2, item 4. Also check Stay awake in Developer options so the phone doesn’t sleep while charging.
The USB mode is wrong — Pull down the notification shade after connecting. If it says “Charging this device via USB”, tap it and switch to File transfer / MTP.
Not enough power — Several phones on one unpowered hub will keep dropping. Use a powered USB hub once you’re past two devices.
Adding More Phones
Click Add Device again and repeat the wizard. Each phone is independent, so you can run different platforms on different phones, or the same platform across many phones for multi-account scaling.
Before You Start Automating
Every account needs its own proxy. Multiple accounts sharing one IP is one of the clearest signals that they belong to the same operator, and it’s how one flagged account takes the others with it.
A new account is not ready for outbound work. Follow, DM, and Comment on a fresh account are the fastest route to a block. New accounts need warming up first, with passive tools only, for the first couple of weeks.
What’s Next
- Warm the account up before doing anything else — see How to Warm Up a New Instagram Account. This is the step people skip and regret.
- Start with passive tools — HBE, Reels Watching, Story Viewer. Almost no risk, and they double as warm-up.
- Leave Follow, DM, and Comment alone until the account has a few clean weeks behind it.
Implementation Tip: Set up exactly one device with one account for your first week. Not five. The point of the first week is learning what normal looks like, so that when something goes wrong later you can tell.
Tutorials & Support
- Telegram Support: Contact Onimator Support